Campfire Cooking
The “UnPewFessional’s” Spatchcock
Giving Thanks for Spatchcock
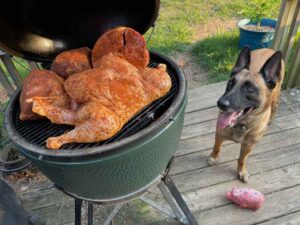
Just because the power is out does not mean we can’t give thanks. It turns out one of my favorite ways for cooking poultry, with my Big Green Egg smoker. Is still feasible if the power grid goes down. But even if the power did not go out, who really wants to cook the bird in a plain old oven? It takes all day and here in the South, it heats up the house. Forget that foolishness and take it outdoors! Think of it as a dry run for the apocalypse, what’s more simple than some wood and fire for feeding the family.
I want to share one of my favorite techniques for cooking a turkey. It works with dry or wet rubs and even injections.
To boil it down in its simplest terms, Spatchcocking Turkey involves removing the backbone and flattening the turkey. Doing this means you can cook a whole turkey to safe consumption temperatures in around 3 hours! Spatchcocking helps it cook faster for a few reasons. First, the flattened shape allows for more even heat distribution, ensuring that the turkey cooks more uniformly. Additionally, spatchcocking exposes more of the turkey’s surface area to heat, which helps to accelerate the cooking process. The reduced thickness of the bird also reduces the overall cooking time. As a result, spatchcocking can help you achieve a quicker and more evenly cooked turkey. All while keeping it juicy and moist. This method is so quick and non-intrusive that I regularly cook turkeys throughout the year, instead of saving it for what most consider a special occasion.
The first thing you need to do is chose either fresh or frozen turkey. If you go the frozen route, you need to make sure that you plan ahead to properly defrost a frozen turkey. You need to remember that it is important to follow safe, defrosting practices to prevent the growth of harmful bacteria and remember that you need to cook the turkey soon after it has been fully thawed.
It is almost universally accepted that just leaving a frozen turkey on the countertop to defrost is not a safe method. Not only will that method promote bacteria, but in my case, with dogs, they would most likely steal it off the counter, like “A Christmas Story”.
There are basically two different ways of safely defrosting a turkey.
1. Refrigerator Method: Place the wrapped turkey on a tray or pan and thaw it in the refrigerator. Allow approximately 24 hours of defrosting time for every 4 to 5 pounds of turkey. Keep the turkey in its original packaging and ensure that the refrigerator temperature is set at or below 40°F (4°C).
2. Cold Water Method: If you need to thaw the turkey more quickly, you can use the cold water method. Ensure that the turkey is in a leak-proof plastic bag to prevent water absorption. Submerge the turkey in cold water, changing the water every 30 minutes. Allow 30 minutes of defrosting time per pound of turkey. For example, a 10-pound turkey would take around 5 hours to thaw using this method.
OK so I know I said that there were two methods for safely defrosting a turkey. But online I have found a crazy method that some people swear by it but just the thought of it makes my head spin.
3. Microwave Method: Some microwaves have a defrost setting specifically for turkey. Follow the microwave manufacturer’s instructions for defrosting a turkey, as the process may vary depending on the size of the bird and the microwave’s wattage. Be cautious with this method, as uneven defrosting or partial cooking can occur if not done properly.
My preferred technique is combining both the refrigerator and water method. Since I like to brine my turkeys anyway, what I do is prepare the brine and submerge the frozen turkey in the brine. Then let it sit in the refrigerator until it thaws. It may take a couple days, but eventually it gets there, and you do two things at one time- it’s a win-win. Once you have your turkey, safely thawed, I would recommend going ahead and spatchcock the turkey first, and then apply whatever secret herbs, spices or injections to make your perfect turkey.
To spatchcock a turkey, you’ll need to follow these steps:
1. Start by placing the turkey breast-side down on a cutting board or a flat surface.
2. Using a pair of kitchen shears or sharp poultry scissors, cut along one side of the backbone, starting from the tail end up to the neck.
3. Repeat the cut on the other side of the backbone to completely remove it.
4. Flip the turkey over and press down firmly on the breastbone to flatten the bird.
5. Tuck and flip the wings, thighs and legs over so they spread out from the breasts.
Remember to exercise caution and use sharp utensils while performing these steps. As you cut the ribs and split the backbone there are sharp edges and you don’t wanna cut yourself.
Now that we have a turkey basically spatchcocked, go ahead and season the turkey to your hearts content. Make sure to season on both sides of the turkey, then throw it on the smoker.
To smoke a turkey, you can follow these general steps:
1. Prepare the smoker: Set up your smoker according to its instructions. Preheat it to a temperature of around 225-250°F (107-121°C). Use hardwood chips or chunks for smoke flavoring, such as hickory, apple, or cherry.
2. Smoke the turkey: Place the turkey on the smoker’s cooking grate, breast-side up. Close the lid and maintain a consistent smoking temperature. I have found in my big green egg that if I get the temperature up to around 300° I can cook most turkeys in less than four hours.
6. Monitor the temperature: Use a meat thermometer to check the internal temperature of the turkey. The thickest part of the breast and thigh should register at least 165°F (74°C) for safe consumption.
7. Baste or mop the turkey (optional): Throughout the smoking process, you can baste the turkey with a liquid of your choice, such as a mixture of melted butter and herbs, to add flavor and moisture. But remember, every time you open the smoker the temperature is dropping so you need to make sure that you’re keeping an eye on it.
8. Rest and carve: Once the turkey reaches the desired temperature, remove it from the smoker and let it rest for about 15-20 minutes before carving. This allows the juices to redistribute.
Remember, smoking a turkey can take several hours, so it’s important to plan accordingly and ensure food safety by cooking the turkey to the appropriate internal temperature. Not only is cooking the centerpiece of our Thanksgiving meal outside great practice for cooking in case the power goes out. But I think it tastes better because you get those extra infused flavors from the smoking process. And even though it still takes a couple hours to cook, in reality the cooking time is cut in half from a conventional oven. It’s an old wives’ tale and a running joke in popular culture that successfully cooking a moist juicy turkey is damn near impossible. However, using the technique of spatchcock in a turkey makes the process super simple, especially if you use a probe type thermometer. Using a thermometer is the scientific way to let you know if you’re on the right path instead of guessing. Without the thermometer telling you what the real temperature is internally, there’s no way to tell when the turkeys done from the outside appearance. So a good thermometer, in my opinion is your best friend when spatchcocking turkeys. Most of the time when I tell people about spatchcocking they look at you like you have three eyes. The benefit, though, is that once people taste your turkey that you made with your crazy backbone removing technique, they will think you’re a genius!
If you’re more of a visual learner, which I understand because the process I’m talking about seems far-fetched. Here’s a great roughly 2-minute video that describes the process perfectly, and will have you spatchcocking poultry like a pro in no time.
What’s your favorite turkey technique?
James The “XDMAN” Nicholas Mr. UnPewFessional Himself
-
 Hiking & Climbing1 week ago
When Bears Bring the Drama: A Tail—or Should I Say “Tale”?
-

 Adventure1 month ago
REACTION: Trump’s Make America Beautiful Again Agenda
-

 Gear2 months ago
Let Freedom RING! Primary Arms’ Independence Day Category Sale Starts NOW
-

 Adventure2 months ago
U.S. Bighorn Sheep Going Home to Canada
-
 Fishing4 weeks ago
My Wacky Bush Brings All the Bass to the Yard
-
 Camping & Survival2 days ago
Field Dressing 101: Knowing When It’s Their Turn
-

 Adventure3 weeks ago
No Ivy Required: University of Montana’s New Center for Hunting and Conservation

