How to Build a Survival Shelter: Complete Field Guide for Any Terrain
Last updated: October 6, 2026 · Originally published September 21, 2026
Shelter is the most urgent survival priority in most environments, ahead of water and food, and this covers building one in any terrain.
Shelter is the most urgent survival priority in most environments — more urgent than water, more urgent than food, and in cold or wet conditions, more urgent than anything else. Exposure kills faster than dehydration. A person in wet clothes at 50°F can become hypothermic in under two hours without shelter. A person without water in a temperate environment can survive three days. The math is clear: shelter comes first.
This guide covers how to build a survival shelter in every practical scenario: debris hut construction, tarp setups, natural shelter selection, ground insulation, and the site selection factors that determine whether your shelter works or fails. It also covers the heat loss principles that explain why these techniques work — understanding the physics makes you a faster and better improviser. Pair this with the fire-starting guide and the wilderness first aid guide for a complete survival foundation.
Shelter Priorities and Heat Loss Prevention
The Four Heat Loss Mechanisms
Every survival shelter decision reduces one or more of four heat loss mechanisms. Understanding these shapes every choice you make.
- Conduction: Direct contact heat transfer. Cold ground conducts heat out of your body 25–30 times faster than cold air at the same temperature. Ground insulation is not optional — it is the single most important insulating layer in any survival shelter. A person sleeping directly on the ground in a warm sleeping bag will eventually lose to conduction.
- Convection: Heat loss to moving air. Wind dramatically accelerates heat loss — the wind chill effect. Windbreak is the primary function of any shelter structure. Even a thin barrier that stops wind is more effective than thick insulation with wind exposure.
- Radiation: Heat loss to colder surrounding surfaces. A reflective barrier (emergency mylar blanket, reflective tarp) dramatically reduces radiated heat loss by returning your body heat back toward you. Enclosing a small space traps radiated heat more effectively than an open structure.
- Evaporation: Heat loss from wet clothing or skin. Stay dry. Wet clothing loses 90% of its insulating value. If you’re wet, drying out is the immediate priority — either by fire or by removing wet clothing and adding dry insulation.
Shelter Size: Smaller Is Warmer
The most consistent mistake in survival shelter construction is building too large. Your body heat has to warm the air inside the shelter. A large shelter requires more body heat to maintain warmth than a small one. The correct survival shelter is just large enough to fit your body with insulation surrounding you on all sides. You should be able to touch the walls without fully extending your arms. Discomfort and warmth are the trade-off — prioritize warmth.


Site Selection: Before You Build
The location of your shelter determines 50% of its effectiveness before you place a single branch. A poorly sited shelter in a perfect location is better than a perfect shelter in a poor location.
What to Look For
- Natural windbreak: A hillside, large rock face, dense tree line, or ridgeline that blocks prevailing wind. Orient the shelter entrance away from prevailing wind direction. In the northern hemisphere, a north-facing slope is the coldest — avoid it for shelter placement.
- Natural overhead protection: A large conifer with dense branches, a rock overhang, or a dense canopy reduces precipitation load on your shelter and reduces the material required to achieve waterproofing.
- Proximity to building materials: You need large volumes of debris, branches, and insulating material within easy reach. A site that requires carrying materials 100 yards is a site that will exhaust you before the shelter is complete.
- Dry ground: Avoid low ground, hollows, and valley floors where cold air pools and moisture accumulates. A slightly elevated, flat area with good drainage is ideal.
What to Avoid
- Dry riverbeds and flood plains — they flood without warning
- Directly under dead trees or large dead branches (widow makers)
- Hilltops and exposed ridges — maximum wind exposure
- Dense brush at ground level — provides ambush cover for animals and collects condensation
Debris Hut: The Best Primitive Survival Shelter
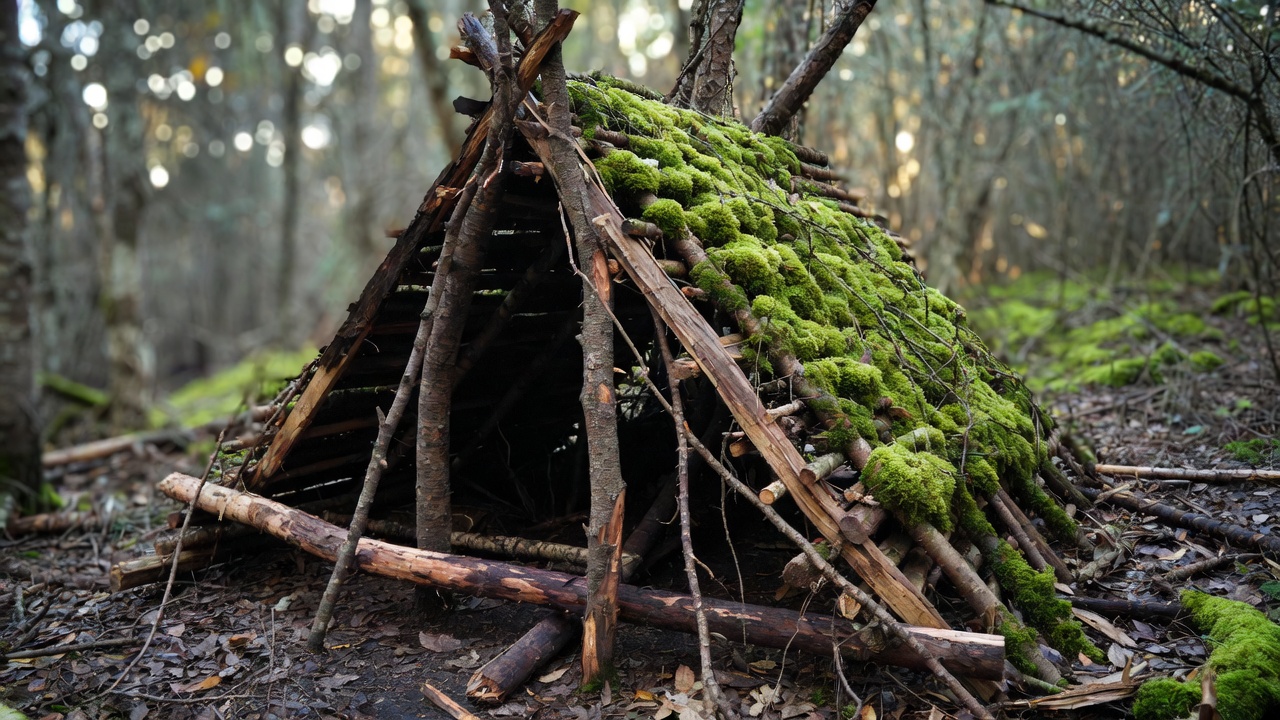
The debris hut is the most thermally effective primitive shelter that can be built without tools or carried materials. When properly constructed, it traps enough body heat to keep a person alive in near-freezing temperatures using only forest debris. It requires no fire, no equipment, and no special skills beyond following the construction sequence correctly.
Debris Hut Materials
- One ridgepole: a straight branch or small log, 9–10 feet long, roughly 4 inches in diameter — strong enough to support weight without breaking
- Ribbing branches: 20–30 branches, 4–6 feet long, angled against the ridgepole to form the frame
- Debris for thatching: large volumes of leaves, pine needles, grass, ferns, bark — anything dry and insulating
- Ground insulation: dry leaves, grass, pine needles — minimum 4 inches of loft, ideally 6–8 inches
Debris Hut Construction Step-by-Step
- Set the ridgepole. Prop one end of the ridgepole on a stump, low branch fork, or Y-shaped upright stick at approximately hip height. The other end rests on the ground. This creates the central spine of the shelter.
- Establish the body cavity size. Lie down alongside the ridgepole to mark the length. The shelter interior needs to extend 12 inches beyond your head and 12 inches beyond your feet. Mark these points.
- Build the rib frame. Lean ribbing branches against both sides of the ridgepole at roughly 45-degree angles, close enough together that debris won’t fall through easily. Think of a fish skeleton — the ridgepole is the spine and the ribs angle out at 45 degrees.
- Layer debris from the bottom up. Start at ground level and pile debris on the rib frame, working upward like shingles on a roof. Each layer slightly overlaps the layer below to shed water. The minimum effective depth is 2 feet of debris — 3 feet is better. When you can’t see light through the roof, you have enough.
- Insulate the ground. Fill the interior with 6–8 inches of the driest, fluffiest debris available. Dry leaves and pine needles are ideal. This is the most critical component — do not skimp. Compress and re-fluff the material before lying in it to check depth.
- Create a door plug. Gather a loose bundle of debris — leaves, grass, branches — large enough to fill the entrance opening. Pull it in behind you once you’re inside. This seals the entrance and prevents convective heat loss.
- Add weight to the exterior. Pile additional branches or debris against the outside to anchor the thatching against wind. A debris hut that blows apart in the night is not an option.
Debris Hut Performance Expectations
A well-built debris hut in dry conditions with adequate debris depth can maintain interior temperatures 20–30°F warmer than ambient air using body heat alone. In freezing conditions, this is the difference between survival and hypothermia. Construction time with practice: 1.5–2.5 hours for a full debris hut. The labor investment is worth it — this shelter lasts multiple nights and requires no fire to maintain warmth.
Tarp Shelter Setup
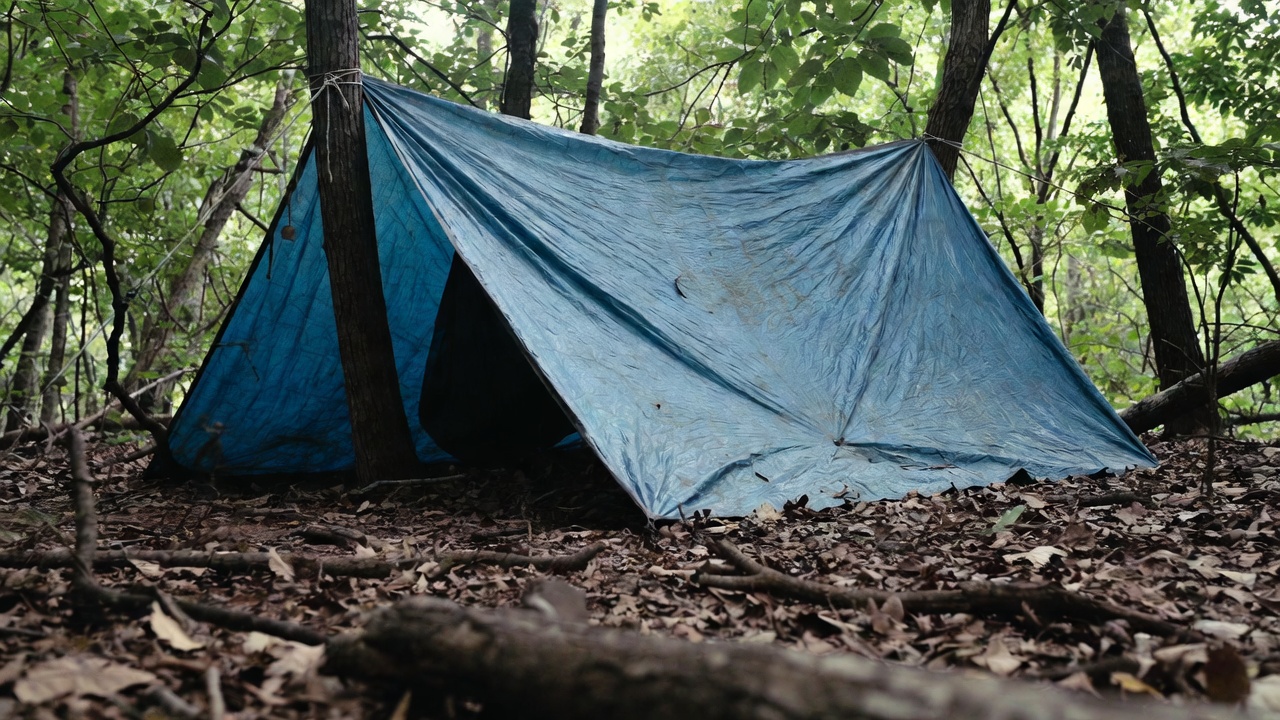
A tarp and 20 feet of cordage is the most practical carried shelter system for any outdoor emergency kit. A tarp setup can be deployed in 15–30 minutes, provides reliable rain protection, and configured correctly also provides significant wind protection. The limitation compared to a debris hut is that tarp shelters don’t trap body heat — they require a sleeping bag, insulated pad, or fire for warmth. For planned outdoor use, a tarp is the correct tool. For survival sheltering without carried gear, the debris hut wins.
A-Frame Tarp Setup
The A-frame is the fastest, most stable tarp configuration for rain protection:
- Run a ridgeline between two trees at approximately shoulder height. Paracord, bank line, or any strong cordage works. The tighter the ridgeline, the better the structure.
- Drape the tarp over the ridgeline centered so equal amounts hang on each side.
- Stake out the two lower edges at 45-degree angles, creating a triangular cross-section. Tighter stakes = more interior space. Steeper angles = better rain shedding.
- Close one or both ends with additional cordage or stake-outs depending on wind direction. Close the windward end.
Lean-To Tarp Setup
The lean-to sacrifices rain coverage for fire-facing warmth. It’s the correct configuration when fire is available as the primary heat source:
- Run a ridgeline at roughly head height between two trees.
- Attach the top edge of the tarp to the ridgeline.
- Stake the bottom edge of the tarp to the ground at a 45-degree angle away from the ridgeline, with the opening facing the fire.
- The reflective surface of the tarp (if present) faces the fire to reflect heat back toward the sleeping area.
Ground Cloth Use
In any tarp shelter, the tarp’s second most important function after rain protection is ground insulation when used as a ground cloth under your sleeping position. A tarp between your body and the ground eliminates direct conductive heat loss to wet soil. When two tarps are available, the ground cloth is the more critical deployment of the two for warmth.
Natural Shelter Options
Fallen Log Shelters
A large fallen log provides an immediate windbreak and a structural frame for debris piling. Lie alongside the log to gauge the protected zone, then pile debris on the opposite side to create a lean-to structure with the log as the back wall. This significantly reduces the ridgepole and framing material required for a debris hut and leverages existing structure.
Rock Overhangs and Caves
Natural rock overhangs provide immediate rain protection and thermal mass (rock stores and slowly releases heat). The limitations: they’re often damp, cold at the floor, and provide no wind protection unless the opening faces away from prevailing wind. Insulate the floor heavily and block the opening with debris or branches before occupying any rock shelter.
Dense Conifers
Large conifers with dense, low-hanging branches create a natural dry zone under their canopy — the ground immediately beneath a dense spruce or fir often stays dry even in heavy rain. Scraping leaf litter and pine needles into a pile under the canopy creates a serviceable emergency overnight insulation bed. Not a complete shelter, but a fast improvement on bare ground exposure.
Ground Insulation: The Non-Negotiable Step
No shelter is complete without ground insulation. Regardless of shelter type — debris hut, tarp, natural — the ground insulation layer determines whether you stay warm or lose the fight to conduction.
The minimum effective ground insulation depth is 4 inches of dry, compressible material. Six to eight inches is the target for cold conditions. Materials in order of effectiveness: dry leaves, dry pine needles, dry grass, bark shavings, dry moss, cattail fluff. Wet material provides almost no insulation — gathering from underneath logs, inside hollow trees, or the interior of debris piles finds dry material even in rain.
The test: press your hand into the ground insulation layer for 30 seconds. If you feel cold ground through the material, add more. Your body is significantly heavier than your hand — if you can feel cold in 30 seconds with your hand, your body will lose to conduction all night.
Frequently Asked Questions About Survival Shelters
What’s the fastest survival shelter to build?
A tarp shelter with cordage deploys in 15–30 minutes and provides reliable rain and wind protection — the fastest option when carried materials are available. Without gear, a basic lean-to against a windbreak (large rock, log, or dense brush) with debris thatching takes 30–45 minutes and provides meaningful wind and precipitation protection. A full debris hut takes 1.5–2.5 hours but provides superior insulation and is the correct investment when overnight survival in cold conditions is the goal. Always prioritize ground insulation in any configuration — the floor matters more than the roof in most survival scenarios.
What is the best material for ground insulation in a survival shelter?
Dry leaves are the most available and effective natural ground insulation in most temperate environments. Pine needles, dry grass, bark shavings, and dry moss all work effectively. The critical word is dry — wet insulation loses its effectiveness entirely. Find dry material under logs, inside hollow trees, inside dense brush where rain hasn’t penetrated, or deep inside a debris pile where the exterior layers have protected the interior. Minimum effective depth is 4 inches; 6–8 inches is the target. A 12-inch layer of dry debris can reduce heat loss to frozen ground by over 80% compared to bare ground contact.
Should survival shelters have ventilation?
Yes, but minimal. A small opening — a few inches, not a full open door — prevents dangerous CO2 and moisture accumulation inside a sealed debris hut. In a well-built debris hut, your exhaled breath adds significant moisture to the interior air, and without any ventilation, condensation buildup reduces insulation effectiveness over multiple hours. The door plug should fit snugly but not be fully airtight. A gap of 1–2 inches at the top of the entrance is sufficient. The trade-off is always heat retention vs. air quality — in extreme cold, minimize ventilation; in milder conditions, slightly more airflow reduces condensation buildup without meaningful heat loss.
Published by Chad Dyer, President, Brand Avalanche Media, Inc. Popular Outdoorsman is an independent editorial publication. Product recommendations reflect editorial judgment based on field experience and specifications review.


Reader Favorites
Field-to-table reference desk
From tag to table — official season dates for all 50 states, plus safe doneness temps for your harvest.
| Species | Archery | Firearm |
|---|---|---|
| Deer | Sep–Oct | Nov |
| Elk | Sep | Oct–Nov |
| Turkey | — | Apr–May |
All 50 state wildlife agencies, plus how seasons, tags and licenses work.
Find your state → Network| Doneness | Target |
|---|---|
| Rare | 125–130°F |
| Medium-rare | 130–135°F |
| Well-done | 160°F+ |
Safe pull temps for venison and steak, from Popular BBQ.
View full chart →